A2Z CNC Quick Change Tool Post
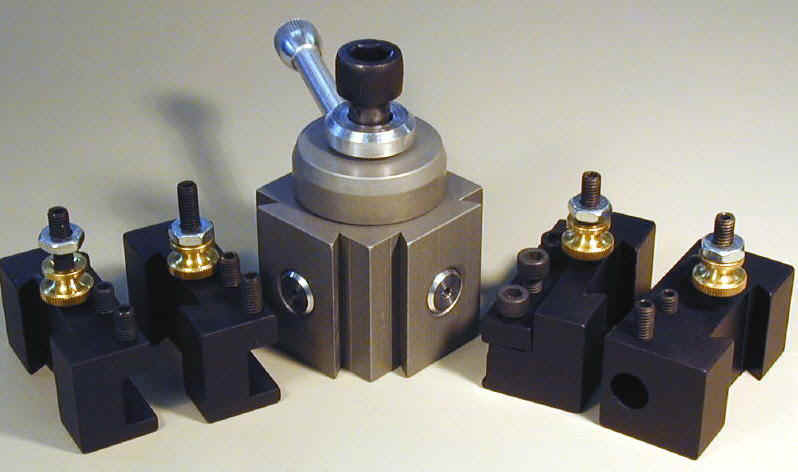
One sure sign of the wide acceptance and large user base of the mini-lathe, is the number of accessory products now available. In the early days, 5 years ago or more, mini-lathe owners were pretty much limited to the stock components that came with the lathe.
In those days, even a steady rest or face plate was hard to find. Over time, Micro-Mark, Harbor Freight, Homier and Grizzly began to offer various accessories. Then LittleMachineShop.com entered the scene, and the options really began to grow.
LMS offered not only accessories made by Sieg (the main manufacturer of the mini-lathes), they searched out products from other vendors that would enhance the mini-lathe and mini-mill. For many users, LMS has become a one-stop shopping source for all or their mini-machine needs.
So it is that we now have a “wealth of riches” to choose from. A few years ago, there was no Quick Change Tool Post (QCTP) available that would conveniently fit the mini-lathe.
Necessity being the mother of invention, James Early developed a neat modification that enabled a full size QCTP to be grafted onto the mini-lathe. It worked, and was a great convenience, but it really was oversized for the job and required a milling machine to implement.
Then TS Engineering came to market with a really nice little QCTP designed specifically for the mini-lathe. It offered all the features of the full-size units, but at a size and cost that better matched the needs of the mini-lathe user.
Plus, you could mount it and get to work in a matter of minutes, without the need to modify the lathe. Now there are at least two other models available that are similar in size and cost the the TSE version. In this article, we’ll take a close look at the A2Z CNC offering.
Why Would I Want One?
In case you missed some of my earlier articles on QCTPs, here’s what makes them so desirable: Each tool has its own dedicated holder with an adjustable height setting. Once the tool is set to the correct height, you lock the height adjusting nuts and it will be at the correct height every time you use it.
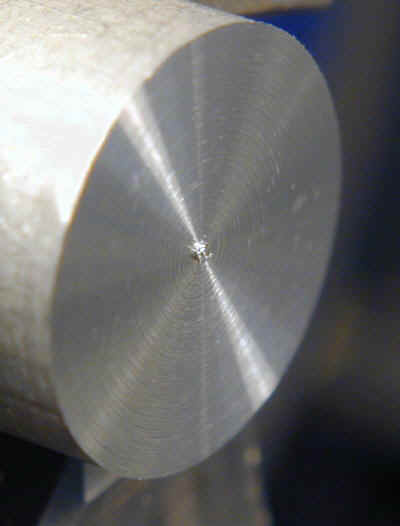
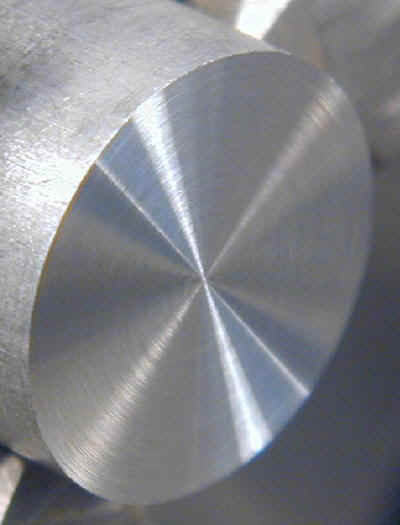
If you already own a lathe, you know that tool height can be critical – even a few thousandths too high or too low can ruin a facing job, since a little nub will be left at the center of the workpiece.
The photo on the left below shows the nub left by the tool being just a few thousandths too low; the right hand photo shows a smooth face from a tool at the proper height.
If the tool is a little too high, it will create a cone-shaped nub and you may feel increasing resistance on the cross-feed handwheel as the tool approaches the center of the work. Tool height is also critical for parting (cut-off) work.
The other great advantage of a QCTP, of course, is simply speed and convenience: time that would otherwise be spent changing tools and adjusting their heights is instead spent on productive machining.
If you don’t already own a lathe, you may not know that, lacking an adjustable height toolholder, you must fool around placing thin metal shims (such as the leaves from an automotive feeler gauge) under the tool until it is at the right height.
This can be a time-consuming and frustrating exercise. If you spend more than an hour or two a month using your lathe, you will find the convenience of a QCTP well worth the investment.
What You Get
A2Z CNC is based in Englewood, CO, and they do all the manufacturing in the USA. The machining is top-quality and I could find no flaws or defects in any of the components. The main toolpost and tool holders are hard-anodized aluminum. The basic set is currently priced at $75.00 at LMS and includes the following elements:
- Tool Holder and M10 mounting bolt
- 2 standard (turning) tool holders with .510″ slots
- 1 boring tool holder for 3/8″ shank boring tools
- 1 cutoff tool holder for 1/2″ cutoff tools
Everything comes in a small box, along with a single page of instructions. You really don’t need anything more than that, since the operation is pretty intuitive and easily explained. Additional tool holders are available for $14.00 each and you’ll probably find that you want at least three more in addition to the two that come with the basic set.
One thing to watch out for: on the unit I received a few of the set-screws had apparently worked loose during shipping. I found one of them in the larger box that LMS used for shipping, but two more were MIA. These are standard SAE (non-metric) components and can easily be replaced, if necessary, but might not be readily at hand in your shop.
How To Use It
The first step is to remove the stock 10MM tool post bolt from the compound rest. Then use the bolt supplied with the QCTP to bolt it down to the compound rest. You will need a 8mm hex wrench for this task and I find that a T-handle hex wrench is quite convenient to use.
The 8mm wrench is also used to loosen the bolt any time that you need to change the angle of the toolpost on the compound, so you’ll want to keep it close at hand.
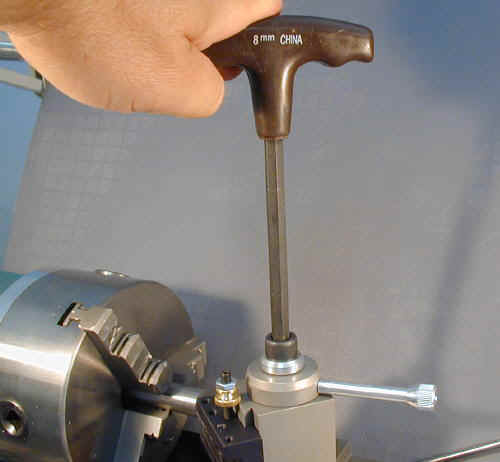
The toolpost has two male dovetails, each with a piston to lock the tool holder in place. With the mounting bolt loosened, rotate the tool holder so that one of the dovetails is facing towards the headstock and the other dovetail is facing towards the rear of the lathe.
For facing operations, the face of the dovetail will usually be angled slightly so that the edge closest to the operator is a little further from the chuck. Once you have it in position, lock it down with the 8mm wrench. Only one of the dovetails is used at a time with the one to rear used only for boring operations.
Mount a cutting tool in the slot of the tool holder. The tip of the tool should not protrude very far; you want the tool to be supported by the holder so that it is as rigid as possible. Ideally, the body of the cutting tool should be a little longer than the tool holder so that the tool can be clamped down along its entire length.
There are four set-screws on the tool holder to clamp the tool in place. Use a 3/32″ hex-wrench to tighten them down snugly so that tool is held firmly in place but, here again, gorilla-like force is unnecessary.
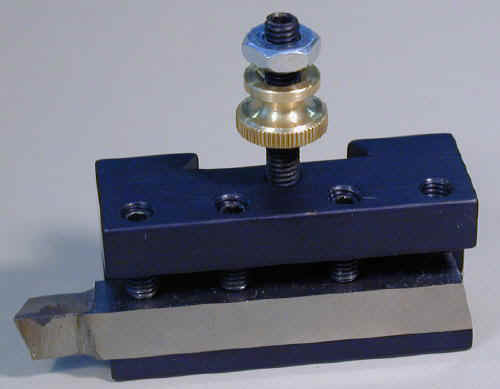
The defacto standard size tool bit for the mini-lathes is 5/16″ square by 2 1/2″ long. Tool blanks in this size can be had for under a dollar apiece on sale. The slot in the A2Z toolholder is large enough to accommodate 3/8″ tool bits, should you choose to.
I prefer to stay with smaller size bits since they are cheaper (therefore I can have more of them!) and take less time and effort to grind. In fact, I have adopted 3/16″ bits as the standard for most of my work, but I use a QCTP of my own design to hold them.
Next, make sure that the piston that locks the tool holder in place is withdrawn into the body of the QCTP. Use a finger to apply a little pressure to the piston while rotating the aluminum locking handle and you will feel the piston move in and out as the handle is rotated.
Rotating the aluminum handle forces the piston outward to lock the tool holder. Since the handle rotates an internal cam, you can rotate it either direction to lock the tool holder to the tool post. Since it is not spring-loaded, the piston will not withdraw unless you apply a little pressure. Once it is properly positioned, however, this step is usually not necessary during routine changing of tool holders.
Drop the toolholder in place on the dovetail and rotate the aluminum handle to lock it in place. Check that the height-adjusting set-screw is firmly tightened to the tool-holder – you don’t want it to rotate when you are adjusting the height.
If necessary, tighten it down using a 3/32″ hex wrench. In fact, it would be a good idea to remove the setscrew, apply a drop of Loctite, and then replace it so that it always stays firmly in place.
Now make sure that the stainless steel jam-nut on the height-adjustment set screw turns freely. Use a small wrench, if necessary, to loosen it. Rotate the nut by hand until it is near the top of the set screw. This will enable you to turn the brass height-adjusting thumb screw as needed.
Mount a short length of 1/2″ or 3/4″ diameter scrap stock in the 3-jaw chuck and tighten it down. We’ll use this for a facing operation to set the height of the tool to dead center.
Loosen the aluminum cam lever so that the toolholder can move up and down, then adjust the height of the tool by eye until the top of the cutting edge is at the center of the workpiece face. Lock the tool holder in place by rotating the aluminum handle until it is snug. Don’t use too much force, since the cam will multiply the pressure applied to the toolholder.
Prepare to make a facing cut by locking the carriage in place. Hopefully, you have added some kind of carriage lock to your lathe (if not, I strongly recommend it). Lock the carriage in place using the carriage lock, or the half-nut lever if you don’t have a carriage lock installed. If using the half-nut lever, first make sure that the lead screw is in neutral (not turning).
Back the tool out until it is clear of the workpiece, then start the lathe and set the speed to about 500-600 RPM. Take a light facing cut until the tip of the cutting tool goes just past the center of the workpiece.
As the tip of the tool approaches the center, you should be able to observe if the tool is too high or too low. Retract the tool, stop the lathe, unlock the toolholder cam and adjust the brass thumbscrew as needed to raise or lower the tool. Lock the toolholder and repeat the facing operation.
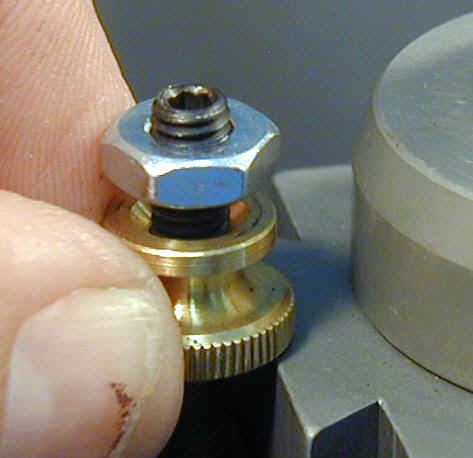
After a few such passes, you should have the tool at dead center so that the face is perfectly flat with no nub at the center. With the lathe stopped, run a fingertip over the center of the face to make sure that it is flat.
Once you get to that point, snug up the stainless jam-nut against the top of the brass thumbscrew to lock in the height setting. Now the tool and toolholder are properly adjusted for use. You will not need to repeat this procedure as long as you keep the tool in the same toolholder (that’s why you need 5 or more toolholders) and do not sharpen the tool which would lower the tip.
By the way – see that little mottling of blood under my thumbnail? It’s the only visible remnant of when I cut the end of my thumb off back in March. For the closest thing you’ll find on mini-lathe.com to True Adventure, you may want to check out the story behind this.
It’s a Boring Job, but Someone’s got to do it
Rather than the square channel on the regular turning tool holder, the boring tool holder has a 3/8″ diameter round hole for holding 3/8″ shank boring tools. No doubt you’ve seen import sets of 9 or 12 of these boring tools in the sale flyers from Enco, Harbor Freight and Grizzly.
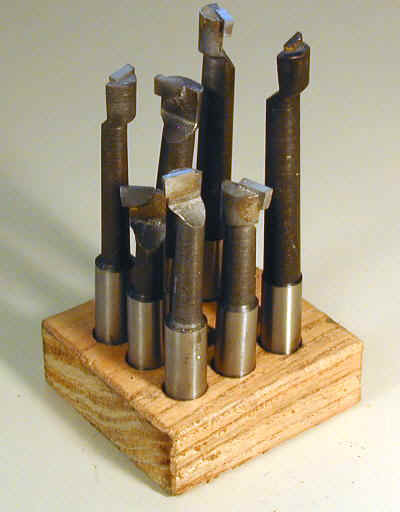
They’re not the most elegant tools I’ve seen, but they are quite effective and inexpensive. I always have 2 or 3 sets of them around the shop since they can also be used on a boring head for the mill and they sometimes succumb to a forceful meeting with a rapidly spinning chuck jaw.
They consist of a steel shaft, of varying thicknesses and lengths, with a carbide cutting tip brazed onto the end. The shank is usually either 3/8″ or 1/2″ diameter, with the 3/8″ ones being better sized for the mini-lathe and mill.
To mount the tool in the holder, loosen the four set screws, then slide the shank of the tool into the hole in the tool holder. Align the cutting edge so that the flat top surface is parallel to the base of the tool holder, then tighten down the set screws.
For the tools I had on hand, the shank is only long enough for three of the four set screws to contact it, but that should still provide plenty of holding power. I used the extra unused set screw to replace the one on the other toolholder, that got lost in shipping.
For boring operations, mount the tool holder on the dovetail facing the rear of the lathe:
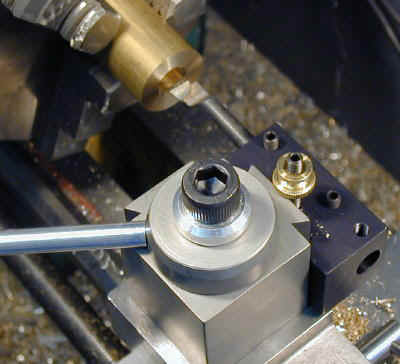
Mount the tool and use the facing procedure described above to center the tool. Now you’re ready to take on some real boring work. If you’d like to learn more about boring operations, including grinding your own special-purpose tools, a tutorial is available in my Premium Content section.
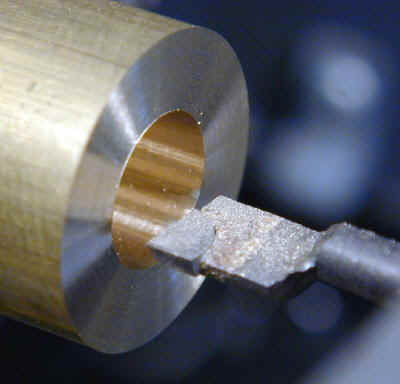
So boring, as it turns out, is not boring at all, but is an interesting and essential machining skill. Now, suppose you did not have a QCTP handy to hold the boring tool? What would you do? Well, you can make your own holder, but it’s nice to have a ready-made solution at hand.
Parting Ways
I often find parting, or cut-off, operations difficult. Grinding your own parting tools is time-consuming and tricky because you must remove quite a lot of metal with the grinder. Not infrequently, after going to all this work, the tip breaks off.
Maybe you get lucky and don’t ruin the workpiece, but you still have to grind a new parting tool. Some of this aggravation can be eliminated by using ready-made parting tools and the A2Z CNC set comes with a holder for 1/2″ tall parting tools.
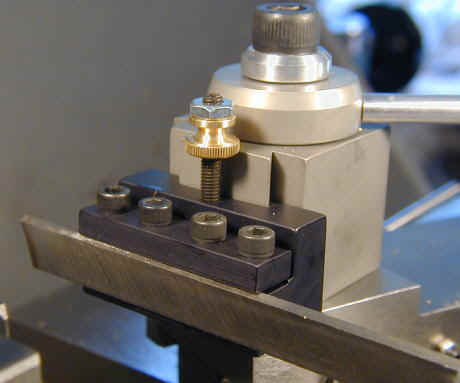
After clamping the tool in the holder, you must get the height properly set as with the other tools. In this case, I just visually aligned the top of the cutting tool with the center of a previously-faced piece of scrap. The height is not quite as critical as for facing, but should be pretty close to, or a little above, the centerline.
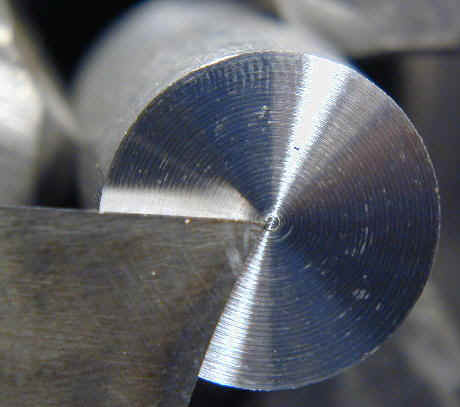
The trick to parting is to use low RPMs – no more than 100 RPM in most cases – and a fairly heavy but steady feed. Cutting oil also helps. Once you begin to get a good cut with a spiral of metal coming off, just maintain a steady feed and cut your way through the workpiece.
If you experience chatter, which is quite common, the rule of thumb is “decrease speed and increase feed”. This seems almost counter-intuitive, but most of the time it works.
I had pretty good luck on my first try using the A2Z QCTP to part off the end of some 3/4″ aluminum stock:
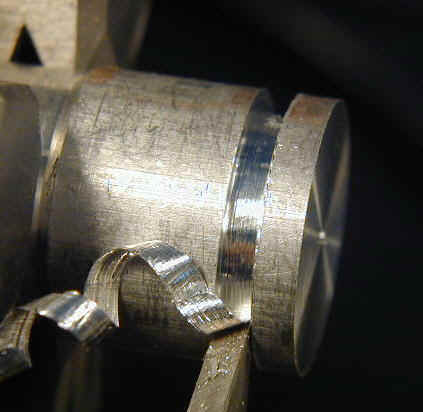
Now for my True Confession: most of time, I don’t even fool around with parting, especially if the workpiece is an inch or more in diameter. I just remove the workpiece from the chuck, clamp it in the vise of the 4×6 bandsaw and fire up the bandsaw (well, not literally, but that did happen once). Quick and painless with no chatter.
Conclusion
The A2Z CNC Quick Change Tool Post is a high-quality, made in USA, accessory that will enhance and expedite your mini-lathe work. If you’re in the market for a QCTP for your mini-lathe, this is definitely one that you should consider.
If you’re not in the market for one, you’re probably just getting started, and you’ll be wanting one before long. This would definitely be high on my list of must-have accessories. The basic set is available from LittleMachineShop.com for $75.00 as of this writing.
Only a few minor quibbles, and they really apply to all QCTPs which follow this same basic design:
- The wrench: I hate having to have a special wrench on-hand (in this case the 8mm hex wrench) every time I need to adjust a tool. I like dedicated handles on things that need frequent adjustment. This could be solved pretty easily, I guess, so I won’t gripe too much about it.
- When tightening the QCTP bolt to the compound, the QCTP has a tendency to rotate, which can be annoying if you’re trying to set a specific angle, as for parting or boring. I expect that with practice this becomes a non-issue.