4-Jaw Chucks

A 4-jaw chuck is a great, almost essential, accessory for any serious lathe worker. While it lacks the self-centering convenience of the the 3-jaw chuck, it has other capabilities. Some things you can do with the 4-jaw are…
- Grip rectangular and other non-cylindrical shapes for turning or facing
- Form rectangular shaped objects
- Precisely center cylindrical stock to within the limits of the lathe’s accuracy
- Hold stock off-center for turning cams or drilling off-center holes
Here’s a nice summary of 3-jaw versus 4-jaw features posted by Bruce Simpson:
Benefits of a 3-jaw:
- self-centering
- can hold hex bar-stock
- quick and easy to use.
Disadvantages of a 3-jaw:
- can’t hold square bar-stock
- run-out/off-center can’t be easily fixed
- can’t hold irregularly shaped work
- can’t turn off-center
Advantages of a 4-jaw:
- work can be centered to high precision
- can handle square/rectangular bar
- can turn work off-center
- slightly more grip on round stock
Disadvantages of a 4-jaw:
- slower/fiddlier to mount work (dial-indicator required)
- can’t hold hex-stock
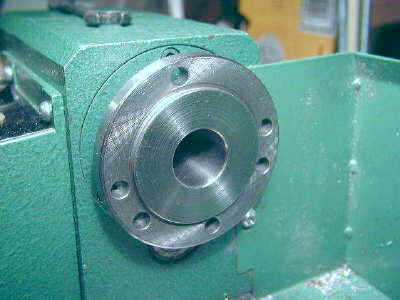
The Grizzly 7×12 has six mounting holes in the spindle plate that mate directly with the J&L 3″ 4-jaw chuck. Note that these mounting holes are not found on the HF SKU 39916 mini-lathe or on the Grizzly Outlet 7×10. Due to its excellent quality, reasonable price and ease of mounting, I highly recommend this chuck.
Centering Cylindrical Stock
There are a number of ways to center stock in the 4-jaw chuck; the technique I will describe here uses a dial indicator. The basic procedure is as follows…
- Open the chuck jaws wide enough to accept the workpiece
- Visually center the workpiece – use circles on chuck face as a guide
- Tighten each of the jaws until snug
- Position dial indicator plunger straight up on top center of workpiece
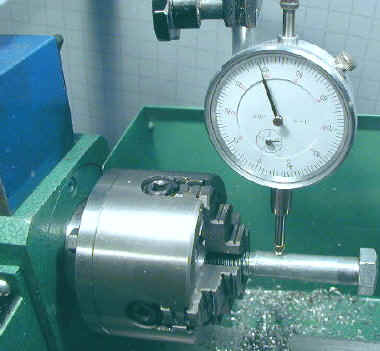
These steps get us ready. Next we follow these steps…
- Turn chuck by hand observing movement of DI needle
- Stop chuck with DI needle at maximum counterclockwise deflection
- Loosen topmost jaw slightly
- Rotate chuck by hand 180º to move opposite jaw to top
- Slightly tighten jaw that is now on top
- Repeat these steps until DI needle shows little or no movement when chuck is rotated.
Here’s how it works: When the DI needle is at its maximum counterclockwise movement, the top surface of the workpiece is at its lowest point.
We loosen the topmost jaw to make room to move the workpiece upwards, then rotate the chuck to bring the opposite jaw on top (or any position where you can easily tighten it) and then tighten that jaw to move the workpiece more on center.
Initially, you will make relatively large movements of the workpiece, but as it becomes more nearly centered you will need to make smaller adjustments or you may overshoot and move it off center in the other direction.
When you get very close to center – the DI needle is moving just a few thousandths – you can make the final centering adjustment by tightening the opposite jaw without first loosening the topmost jaw. This will ensure that the workpiece is tightly clamped and will help to avoid overshooting when only a very small adjustment is needed.
Like any new skill, this procedure takes a little practice at first, but after you do it a few times you will find that is is almost second-nature and can be done in a minute or so.
Forming Non-cylindrical Objects
Due to its inherent rotational nature, a lathe is ideal for turning radially symetrical shapes: cylinders, that is; so it sometimes surprises beginning lathe workers to discover that you can use a lathe to form cubes and other six-sided rectangular objects.
This is done through a sequence of facing operations using a 4-jaw chuck. The following photos show the transformation of a cylinder into a rectangular shape (technically, a rectangular parallelepiped). Once you grasp this potential of the lathe, it opens up a whole new class of things that you can make.


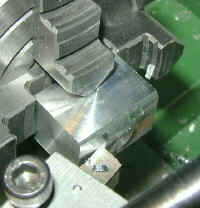


No effort was made on this workpiece to protect the surface from being marred by the chuck jaws, so jaw marks are plainly visible on the finished surface.