Homier Mill Review - page 1
It’s here. It’s red, and it’s hot! The Homier mini-mill is now being offered for $399.99 and it’s every bit as good as the competitors.
As word spread about the $299 7x12 Homier mini lathe, speculation soon followed that Homier might offer a mini mill at a comparably low price.
Early in April, reports started surfacing about ads for Homier truck sales featuring a mini mill for $399, a full $100 lower than the best prices previously seen.
By mid-April a few 7x group members had confirmed that they had purchased the mills and the mill was advertised on the Homier web page.
Needless to say, I had to have one. Not that I need another mill: I have had a Grizzly mini mill for over two years and have been quite happy with it.
But I wanted to see first hand, and report to my faithful readers, exactly how this model stacks up.
Having never used an R8 spindle version of the mill, I was anxious to see how it compares with the #3 Morse taper spindle of the Grizzly mill. Is it as good a bargain as it seems to be? Read on, and find out.
Quick Comparison
While pretty similar in overall construction to the Grizzly Mill, a number of subtle differences were immediately apparent to my highly trained eye (after I put on my glasses, that is):
- Red rather than Green (pretty subtle, huh?)
- Handwheels are spoked, rather than solid
- No ON/OFF toggle switch on the control panel
- Longer spindle shaft
- R8 taper spindle versus #3 Morse Taper on the Grizzly
- Torsion spring to offset head weight (same as on newer Griz models; older Griz models used a gas piston)
The coarse and fine feed for the Z axis are essentially identical to the Grizzly version.
Receiving and Unpacking
Homier is well known for their travelling tent sales. If one visits your area, you can save the freight cost and drive the mill home the same day.
I live in the DC metro area and have never seen a Homier tent sale around here, so freight delivery was my best option.
This can be pretty expensive, so be sure to check with Homier to determine the actual charges to your area.
At 150+ lbs., UPS won’t deliver this puppy. Update (7/17/02) Apparently, they are now shipping by UPS for $70-80 freight charges. Several members of the 7x10 group have reported receiving them via UPS.
If you order one, expect it to arrive by freight carrier - and plan to be at home when it arrives, since you will probably need to help the driver unload it from the back of the truck.
I did, and it was no big deal for the two us to lift it down to the street. From there, the driver hauled it up my driveway on his hand truck into my shop in the garage.
Mine came by Yellow Freight and I have to say that the driver was about as nice and helpful as can be. Here’s a shot of the semi-trailer pulled up in front of my house.

Securely packed in a wooden crate and bolted to the thick wood base, the mill was in perfect condition. You will need some kind of chisel or pry bar to pry off the sides of the box.


I knew from my prior experience in setting up the Grizzly mill, that the easiest way to tackle the operation is to break the mill down into two parts by removing the big nut at the back of the column.
A large wrench is provided which fits the nut. As you can see in the photo, the mill is coated with the thick red packing grease typical of all of the lathes and mills except the Homier lathe.
This suggests that the mill may come from a different manufacturer than the lathe.

Any time you loosen the big nut, be sure to hold the column steady as it is quite heavy and can easily come crashing down to one side or the other if you aren’t prepared for it.
Holding the column firmly, remove the nut and lift the column and head from the base of the mill. This will break the mill down into two sections which are much easier and safer for one person to lift.
You can reassemble them after you get the base mounted securely on your workbench.


Accessories
Just about all the tools you will need for the mill are provided in the bag of accessories which was taped to the table for shipping. The big wrench is securely nailed down to the bottom of the crate.
Also included is a pretty nice drill chuck. Its capacity is 13mm, or slightly over 1/2".
One thing that you want to have on hand soon after the mill arrives is a set of R8 collets or end mill holders.
These are needed to hold various sizes of end mills and are not included. Mine have not arrived yet, so I don’t have any photos at this time.
Two collets are included with the Grizzly mill. Of course you will also need a set of end mills and other accessories.


- Column nut wrench
- Spindle nut wrench
- Open end wrenches
- Drill chuck key
- Oil bottle
- Handwheel handles
- Hex keys
- Spindle lock rod
- T-nuts
Cleanup
Cleanup procedures are pretty standard: remove the packing grease using a paint brush and some WD-40 or kerosene, wipe all surfaces clean with rags, lubricate moving parts with light oil or white lithium grease and use a brush to remove any grit or swarf you may find in the nooks and crannies - especially around the dovetail surfaces.
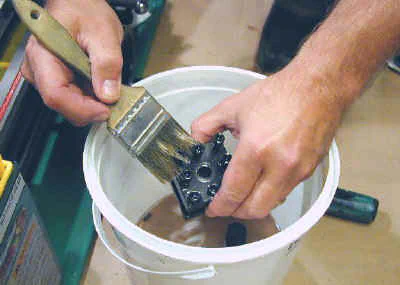

To do a really thorough cleanup job, you need to remove the table, but I don’t recommend this if you are very new to machine tools - getting the leadscrews to feed evenly after reassembly can be a little tricky.
This is one task that can wait until another day when you are more familiar with the mill. Just be sure to remove as much of the red grease as you can get to and then lubricate the sliding parts of the dovetails with light oil or white lithium grease.
To remove the table, first remove the end plate from the left end of the table. Use the handwheel to crank the table all the way to the right until the leadscrew disengages from the nut.
Then carefully slide the table to the right until it is free from the base. Careful - it’s pretty heavy. Catch the gib strip so that it doesn’t get dinged up.


With the table removed, you can clean the leadscrew and dovetails. You are likely to find swarf and maybe even some casting sand if you disassemble the major parts of the mill.
In the picture on the right below you can see quite a lot of swarf where the column mounts to the base. This is not unique to the Homier mill, rather it is common to all of the low cost Chinese import machine tools.
By doing the cleanup yourself, you can have a pretty nice tool at a remarkably low price.


Base and Column
A cast iron base supports the mill. Attached to the back of the base a nicely finished, hollow cast iron column supports the mill head assembly.
The base must be securely bolted to a sturdy workbench for safe operation of the mill (See the Setup page.) The picture on the right below shows the underside of the base casting.


The column is mounted on an accurately ground pivot so that it can be tilted left or right up to about 45 for milling at an angle to the table.
A large nut and washer clamp the column tightly in position at the desired angle.


The head assembly slides along dovetails milled into the front side of the column. Mounted on the front face of the column is a rack that engages with a pinion in the head to move the head up and down along the column.
An adjustable stop slides up and down along the column and can be locked in place to act as a depth stop for the head. Along the left side of the column, a ruler provides a useful gauge for drilling depths, when great accuracy is not required.
At the top of the column, a nylon stop prevents the head from running off the top of the rack.


Table, X and Y Axis Movement
Ground and milled from cast iron, the table is about 4" x 12" in size and has 3 T-slots. T-slots are used with T-shaped nuts to clamp the workpiece directly to the table surface or to clamp a vise to the table which in turn holds the workpiece.
I found the edges of the table and T-slots to be rough and sharp so I cleaned them up with a small file. It’s been a while, but I seem to recall having to do this on the Grizzly mill as well.

The bottom side of the table is dovetailed along its length and rides in a mating dovetail with an adjustable gib strip to take up any slop or wear.
Four gib adjusting screws with lock nuts are easily accessible just below the front of the table. The black lever locks the table for maximum rigidity when X-axis movement is not required.
A similar arrangement for the Y-axis, but with only two gib adjusting screws, can be found below the table on the right side of the mill.
The locking handle is spring loaded and can be pulled out and reset to a new angle relative to the locking screw if necessary - a nice feature that I have found very handy at times.


Movement to the left or right (X-axis) is controlled by the X-axis handwheel mounted on the right side of the table.
The handwheel turns a leadscrew that engages with threaded brass nut. The table rides on the Y-axis casting that is moved front to back by turning the Y-axis handwheel which has its own leadscrew and mating brass nut.
Both leadscrews are 16 tpi, so each rotation of the handwheel moves the table by 1/16" (.0625).

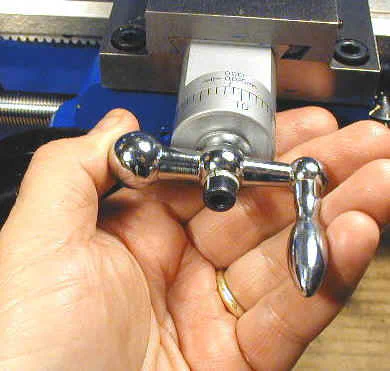
The handwheels are cast iron, but are of a somewhat lighter weight open construction than the solid construction of the handwheels on the Grizzly mill.
The heavier wheels of the Grizzly actually have more of a flywheel effect which is handy when you are moving the table rapidly to a new position.
Each handwheel has a graduated dial marked in increments of .001". Since there are 62.5 divisions around the dial, the last division is a half-thousandth (.0005").
While a little confusing, this marking scheme makes a whole lot more sense than the one on my Grizzly mill. On the Grizzly, which is also 1/16" or .
0625" per revolution, the markings go from 0 to 12. If you can explain why, you are ahead of me.
 Markings on Grizzly mill dial
The good news is that it’s easy to move the table by multiples of 1/16". To move the table 1/2", for example, just note the dial position, count off 8 revolutions of the handwheel, and stop at the same division you started with.
Head Assembly
The head assembly is quite similar in construction to the Grizzly mill, and the major parts look as if they might even be interchangeable with the Grizzly.
The head can be quickly moved up and down the column by means of the drill-press-style 3-arm handle. The large silver knob on the right side is a fine-feed adjustment knob that allows the head to be moved up and down with precision to .
001".


Mounted to left side of the head is the motor control box. On the front, a chip shield with adjustable height is provided for safety. The chip shield is the same as the one on the Grizzly mill which I found to be of limited use.
The basic idea is good, though, so I made one that I like much better and use religiously. I’ll be adding my design to the modifications page at a later date.
On the back of the head is located the Hi/Lo gear lever. This lever selects the speed range - 0 to 1100 RPM in LO range and 0 to 2500 RPM in HI range - by engaging gears within the head casting.
Most milling operations are done in LO range, with HI range being used mainly for drilling with small diameter drills. HI range is also useful for making light finishing cuts of less than .
005" depth.


A spring-loaded arm helps to offset the weight of the head. The arm slides along a stud mounted to the side of the head. Early models of the Grizzly mill used a pressurized gas piston mounted in the column for this purpose.
The torsion arm seems to work fine, but Steve Bedair reports that it prevents the head from getting as close to the table as is sometimes necessary - he modified the mounting to solve this problem.
(This used to be a link to Steve’s site, but that content is no longer available)
Rapid movement of the head up and down the column, referred to as Z-axis movement, is accomplished by turning the drill-press-style 3-arm handle. This handle can move in and out on its shaft to switch from coarse-feed to fine-feed.
In fine feed mode, the silver knob at the front of the head moves the head up and down in increments down to .001".


This arrangement is identical to that on the Grizzly and suffers from the same weaknesses: there is considerable backlash (nearly a full turn of the silver dial- but this can be reduced with some work) in the fine-feed drive, and a tendency for the head to slip downward during cutting operations if it is not tightly locked in place by means of the gib locking lever (visible below the hub of the 3-arm handle).
On the plus side, this arrangement works very well for drilling operations and, with care and practice, can produce milling cuts to a desired depth with acceptable accuracy.
Spindle and Drawbar
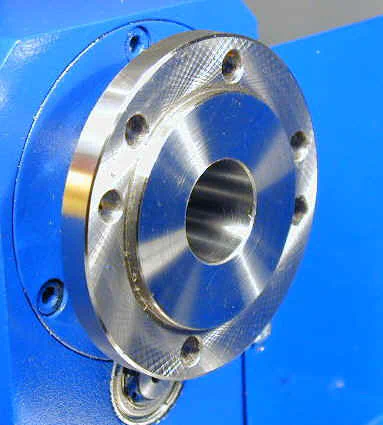
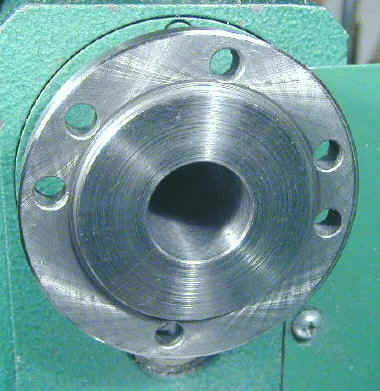
Unlike the Grizzly mill, which has a #3 Morse Taper spindle, the Homier mill sports an R8 taper spindle typical of Bridgeport and similar full size mills.
I have not used an R8 taper before, so I have no real basis on which to comment on the pros and cons, but some machinists seem to prefer them. There is a wide variety of tooling available for the R8 taper, so finding end mill adaptors is easier than for the #3MT variety.
Below the Homier and Grizzly spindles are shown side by side for comparison.
Shown below is a comparison of the drill chucks and arbors for the Homier Mill and Grizzly. The right hand photo shows the corresponding drawbars. For both types, the drawbar mates with a female thread in the top of the arbor and, when tightened, draws the arbor tightly into the spindle so that it will not work loose during cutting operations.
The R8 taper has a spline along its length that must be aligned with a key in the spindle.
The Morse taper is known as a locking taper and the R8 as a non-locking taper, the difference being that a non-locking taper tends to release from the mating taper more easily once the drawbar is loosened.
For either type, you generally need to tap on the top of the drawbar with a brass or plastic hammer to release the arbor.


To keep the spindle from rotating as the drawbar is being tightened a spindle locking pin is inserted into a hole in the side of the head assembly. Of course, the locking pin must be removed before starting the mill, or the gears could be damaged. Steve Bedair made a spring-loaded locking pin to avoid this risk.

Collets and Adaptors
Shown below is pair of R8 collets and a 1/2" R8 end mill adaptor. Either can be used to hold end mills, but the collets are less expensive - I purchased a set of six (1/8-3/4 by 1/8) from Enco (P/N 231-4606) for about $23 from the sale flyer.
This set will hold just about any end mill you are likely to use. By comparison, the single end mill adaptor (Enco P/N 210-0106) was $12.99 in the sale flyer.
You will need several to hold end mills with various shank diameters. Be sure to order one or the other when you get your mill, since none are provided.
The #3 Morse taper adaptors for the Grizzly mill run about $18 each and are much harder to find, however the Grizzly mill comes with a 3/8" and 1/2" collet to get you started.


Motor and Electronics
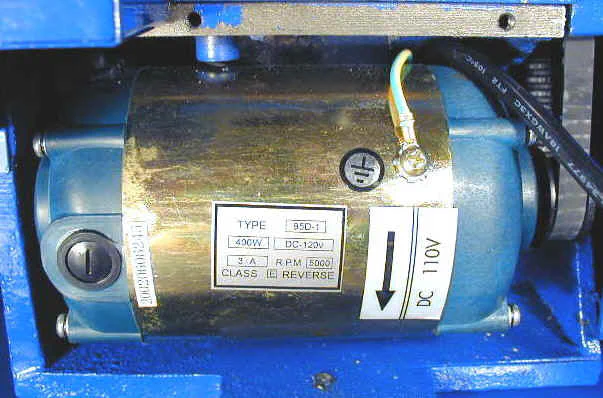
Mounted on top of the head assembly, the motor is indistinguishable from the one on the Grizzly mill. It is labeled with the standard 4/5HP rating which no one I know really takes seriously.
1/2HP is probably closer to reality, but the motor has plenty of power for this little mill, so it’s really not worth debating. As many of us have discovered: you will break the gears before you stall the motor.

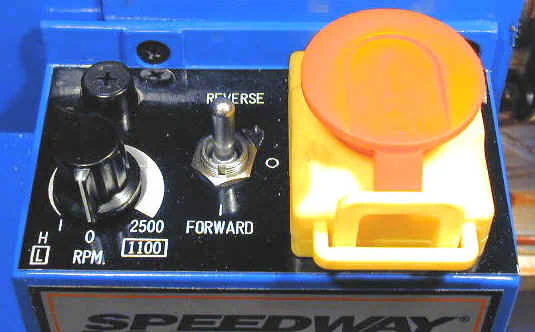
Electronic controls are mounted on the box on the left side of the head with the speed control knob, green power-on pilot light and fuse holder on the front and AC power and emergency stop button and yellow overload pilot light on the left side.
The silver on/off toggle switch found on my early model Grizzly mill is gone but not really needed, since the speed control knob switches the motor off when rotated fully counterclockwise.

The power supply is mounted in a separate box at the top rear of the column. A small DC fan ventilates the box to keep the electronics cool. The power supply design is basically the same as the Grizzly model, but has been updated to use surface mount technology.
Gone is the daughter board with the speed control pots; these components are now mounted on the main board - a much more robust design.
