JW Early’s Quick Change Toolpost Mod
JW Early is a professional machinist and a prolific contributor to the 7×10 interest group. He’s come up with several outstanding improvements to the mini-lathe including this one to mount a rather large AXA size QCTP on the compound slide.
Here’s JW’s description of the QC toolpost mod:
I have been thinking on the problem mentioned by several of mounting a QC toolpost on the 7×10. All who have them have mentioned that they felt the “A” size posts for 6 to 12 inch lathes are too large. I have one of the ENCO/Phase II posts on my South Bend and recently got one of the HF 39083 sets for the 7×10.
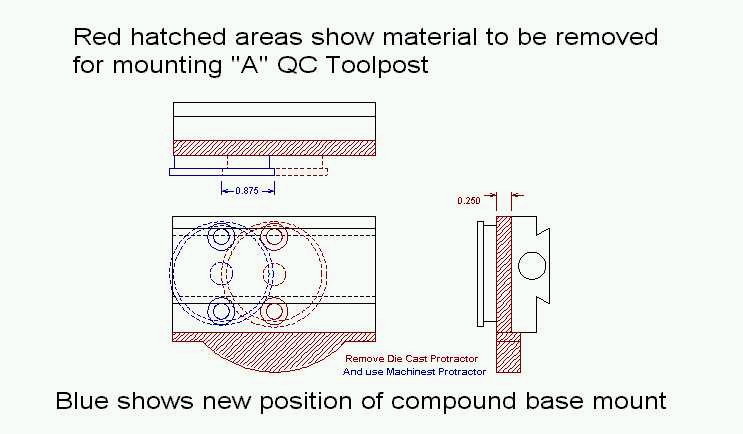
In carefully measuring the compound slide I found where I can remove .250 from the bottom of the compound mounting base. I you will remove the slide and hold just the base in your hand you will notice that there is .400 from the bottom of the feed screw thread to the bottom of the base.
Now measure from the top of the base where the slide fits to the top of the protractor and it should be .260. By taking off the protractor, removing .250 from the compound base and then remounting the protractor you will have gained .250 for the new toolpost.
If you wish to go further the step for mounting the 4-way holder is about .325 tall above the compound slide, you may safely remove .200 from this area giving an increase of .450 total gain in room for the QC tool post.
That is almost 1/2″ more room. When I mounted the 39083 post on my 7×10 with a 3/8 carbide insert holder in it, I only had to drop the tool block .175 below the top of the boss on slide to bring the cutter to center. With these changes I should be able to use 1/2″ cutters with ease.
Also you can do the mod shown on Ty’s page giving more travel to the cross slide and have lots of room. Now the second item in mounting the QC toolpost to the 7×10. Several have mentioned the stud supplied is not the right size. Here is how to fix that. The 7×10 stud is 10×1.25mm.
The toolpost studs are 14mm or 9/16 in size. Get a 10×1.25 tap at Home Depot or other handy store. Cut the supplied stud about 3/4″ longer than the tool post to allow room for the nut.
Drill the bottom of the stud 8.75mm or 11/32″ and tap it with the 10×1.25mm tap the same depth as the stud on the 7×10 compound is long. now lock the supplied and modified stud down. Mount your new QC tool post and go to work with the pleasure of knowing all of your tools are mounted and set for center and ready for instant use.
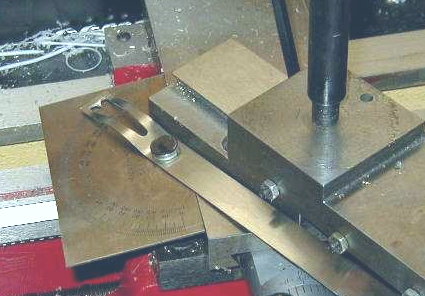
The included photo shows the compound with the toolpost removed to show the modified adapter stud for the QC tool post. Also I have included in the photo the 5.99 protractor that I use for setting the compound angle.
Also while setting things up for this photo I went through the usual pain of almost taking the slide off the base to get to the screws. I then noticed the locking clamp is centered in the compound base.
The only other lathe I am familiar with that does this is the 9×20. The South Bend and Logan as well as other larger machines have the mounting point at the front of the compound base. To accomplish this one would move the mount one inch forward and re-drill the holes.
This will give you up to one inch more room for larger material in the chuck. I will probably do this next Saturday as the lowering of the base worked so good it is now a pleasure to use the machine now with a real tool post for my cutters.
At the same time I will fit a spacer on the cross slide leadscrew and mill out the saddle. I am going to make the spacer a little different as I want to leave room in it for a gear for powerfeed on the cross slide.
I almost have this almost worked out and find I needed to throw away all the old concepts of power feed before the solution became apparent. If the idea works it will be the easiest and cheapest power feed ever.

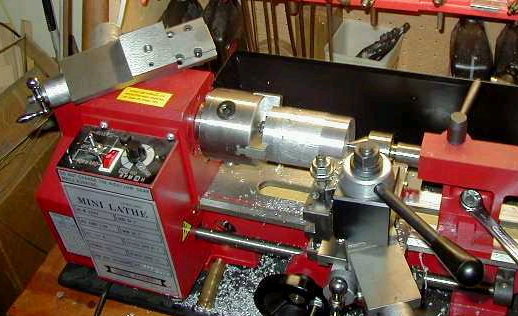
I finished the mods to the compound slide today and am starting on the 1″ spacer for the cross slide lead screw. In the picture the aluminum bar in the chuck is going to make three of the redesigned spacers that will leave room for a power cross feed drive gear.
The other compound slide on the head stock is for 7×10 #2 at work. I will be fitting all three machines with the HF 39083 tool posts as soon as they go on sale again. By the way the tool holder is from the Enco Phase II tool post on the South Bend.
Interesting fact, the holders from the Phase II will fit the 39083 tool post but not the other way around.


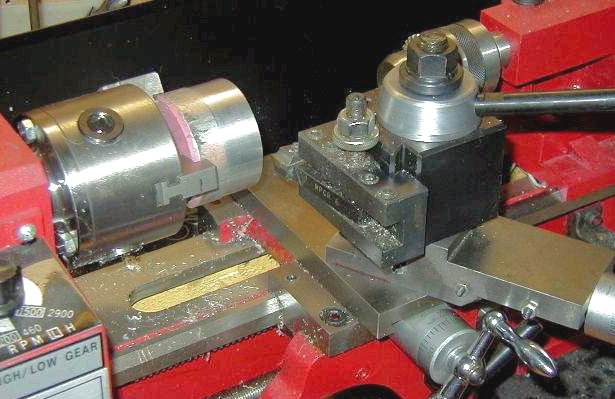
Yes all you do have to modify the compound base to fit the large tool posts. Here are 2 shots of #3 after the compound modification. I have not done the 1″ cross slide mod as yet but it is coming next with some perks added of my own.
If you want the complete instruction let me know and I will post it to you directly. PDF file 1.2 meg and shows marking out, facing off, drilling and all the grimy cast iron details. Any local in the LA area can come by evenings or weekends and look at it and see if they like the way it works.
QC gearbox and power X-feed are next and I will have my dream machine, a shrunk SB that I can tuck under my arm and move it where I want to work with it.
None of you can understand what it means to me to have a real tool post with preset tooling I can drop in and go with, without shimming and having tools I do not need bumping my hand while I am trying to do some work. Oops I almost forgot before I do much more I need to do the cam-lock thing on the SB it needs it almost as much as the 7×10 did.

